

How To Open The Relationship Window In Access 2013
Access for Microsoft 365 Admission 2021 Access 2019 Admission 2016 Access 2013 Access 2010 Access 2007 More...Less
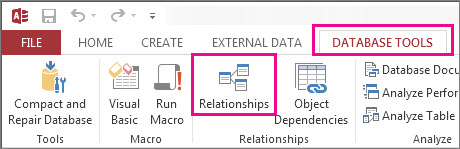
The Relationships window lets you lot define relationship between items stored in multiple Admission tables. It is available past clicking Database Tools > Relationships.
Relationships are like the rules that govern how information is connected in your database. In a well-normalized order-processing database, for example, most likely you'll take customer information in one table and order information in another table. You want to make sure customers don't become separated from their orders, right? And yous don't want an lodge to be created that doesn't have a valid customer connected to it. The Relationships window is where you get to set these rules so that they apply throughout your database.
If y'all've built an Access query before, you'll notice that the Relationships window looks a lot like the top part of the Query Architect:
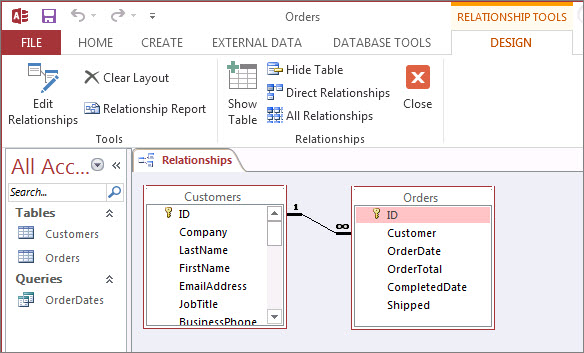
In the Relationships window, you lot utilize the commands on the Design tab to add tables to the view, and then you lot drag fields between tables to prepare the relationships. In this example, the human relationship allows for multiple orders to be continued to each client, only it keeps you from creating an order for a customer that doesn't exist. Once yous set these rules in the Relationships window, they'll employ to the whole database (for example, if you create a new query, the joins will automatically be set according to your human relationship rules).
Note: Deleting a tabular array from the Relationships window won't delete it from your database, nor will it remove relationships that you've already established.
Things you lot can practice
| Task | How to do it |
| Add together a table or query to the window | Click Design > Add together Tables (Show Tabular array in Access 2013), select the table or query you lot desire, and then click Add. |
| Delete a table or query from the window | Select the table or query, and then press DELETE. |
| Hide a table or query | Right-click the tabular array or query, and so click Hide Table. |
| Create a human relationship | Drag a field from one table or query to the corresponding field in the other table or query. |
| Set properties for a relationship | Correct-click the relationship line between two tables (this can take a few tries to hit it exactly right), and and so click Edit Relationship. |
| Delete a relationship | Right-click the human relationship line between two tables (this can take a few tries to hit it exactly right), and so click Delete. |
| Evidence all relationships | Click Design > All Relationships. |
| View the relationships for a detail table | Select the table, and and so click Design > Straight Relationships. |
| View the relationships for one table without viewing the relationships for other tables | Click Blueprint > Tools > Articulate Layout. Add together the table you desire to see relationships for (Design > Relationships > Add Tables (Show Tabular array in Admission 2013),) and so click Design > Relationships > Direct Relationships. |
| Adjust a tabular array size to reveal additional fields and relationships. Note Requires Admission for Office 365. | To automatically size the table, right click a table and select Size to Fit. Or, double-click a table edge on the:
|
| Select a subset of tables Note Requires Access for Role 365. | To help y'all focus upon certain tables and their relationships:
Both these actions highlight the subset of tables with a thicker edge. To unselect, click outside the pick. To motility the pick, click and drag to another location. |
| Use the mouse scroll bike Note Requires Access for Office 365. | Scroll vertically by scrolling the mouse cycle up or down. Scroll horizontally by pressing Shift and then scrolling the mouse bicycle upwards or downward. |
Now that you lot're up to speed on the Relationships window, acquire how to create, edit or delete a human relationship.
Source: https://support.microsoft.com/en-us/office/what-is-the-relationships-window-20c66348-854f-47f8-819a-5cce2518ee1d
Posted by: medranogoomects.blogspot.com
0 Response to "How To Open The Relationship Window In Access 2013"
Post a Comment