

How To Transfer Photos From Iphone To External Hard Drive On Windows
The reality of our device-rich world is this: Yous'll sometimes have a phone or tablet that isn't the aforementioned make as your computer. To make matters worse, you lot might have photos on your iPhone or iPad that you want to transfer to your Windows x PC. Apple and Microsoft don't brand this easy at times, but with the right tools, it's a quick process to save your photos where yous want them.
How to download and install iTunes
While iPhones and other Apple devices have traditionally worked best within its ecosystem, Windows remains dominant in the desktop world. Apple realizes this, with iTunes even so available on Windows PCs, acting every bit the hub for managing your Apple tree devices and content.
Hooking up an iPhone or iPad to your Windows PC isn't equally simple as plugging in the device. Many everyday tasks crave iTunes, which includes a piece of software known as "Apple Mobile Device Support," allowing your iPhone or iPad to communicate freely with your PC to communicate freely. This allows yous to browse the device via the File Explorer, or instantly import photos and videos to your hard bulldoze.
iTunes is available directly from Apple, but likewise via the integrated Microsoft Store. We recommend that those with Windows 10 and Windows 11 visit the Microsoft Store app, providing an easier installation process, versus the traditional application.
- Launch the Microsoft Store from the Get-go menu, taskbar, or desktop.
-
Search for iTunes in the Microsoft Shop.
 Source: Windows Key
 - Click Get. ITunes will now download to your PC.
-
Click Launch once the download is complete.
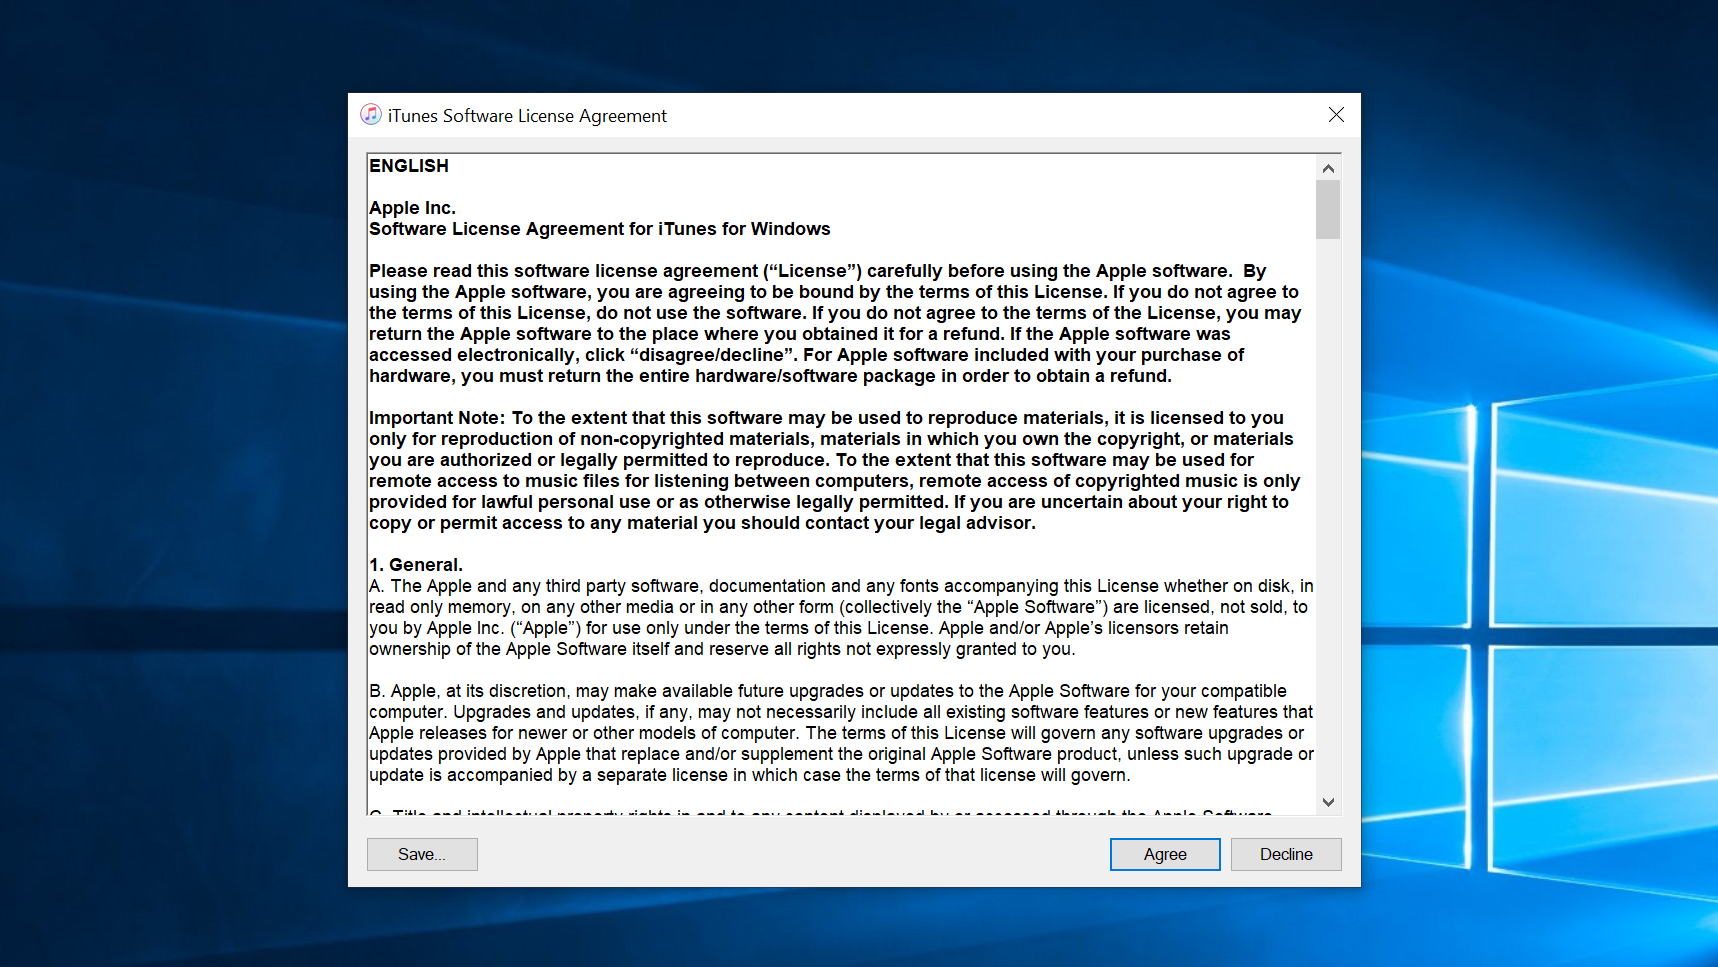 Source: Windows Cardinal
 - Click Concur to accept the iTunes Software License Agreement. ITunes is at present installed.


Alternatively, you can download iTunes from Apple if y'all're using a Windows version prior to Windows ten. Folks using older versions of Windows will demand to install this version of the software, although it offers identical features.
How to transfer iPhone and iPad photos using File Explorer
Once iTunes is installed on your PC, Apple devices like the iPhone and iPad volition exist automatically detected when connected over USB. File Explorer is one of the simplest ways to extract photos and videos, directly connecting the device's onboard storage.
Apple devices are oft named NAME's iPhone or NAME's iPad, the Name denoting the possessor'due south start proper name. Selecting the device through File Explorer will surface various files, including a DCIM media binder. Diving into the DCIM binder isn't much dissimilar from a digital photographic camera, with easy drag-and-drib access to files on your phone or tablet.
Transferring images from your iPhone or iPad is only a few clicks away through File Explorer, using the steps below.
- Plug your iPhone or iPad into your PC using a suitable USB cable.
- Launch Windows Explorer from your desktop, Start menu, or taskbar. You tin can also apply the Windows key + E shortcut on your keyboard.
-
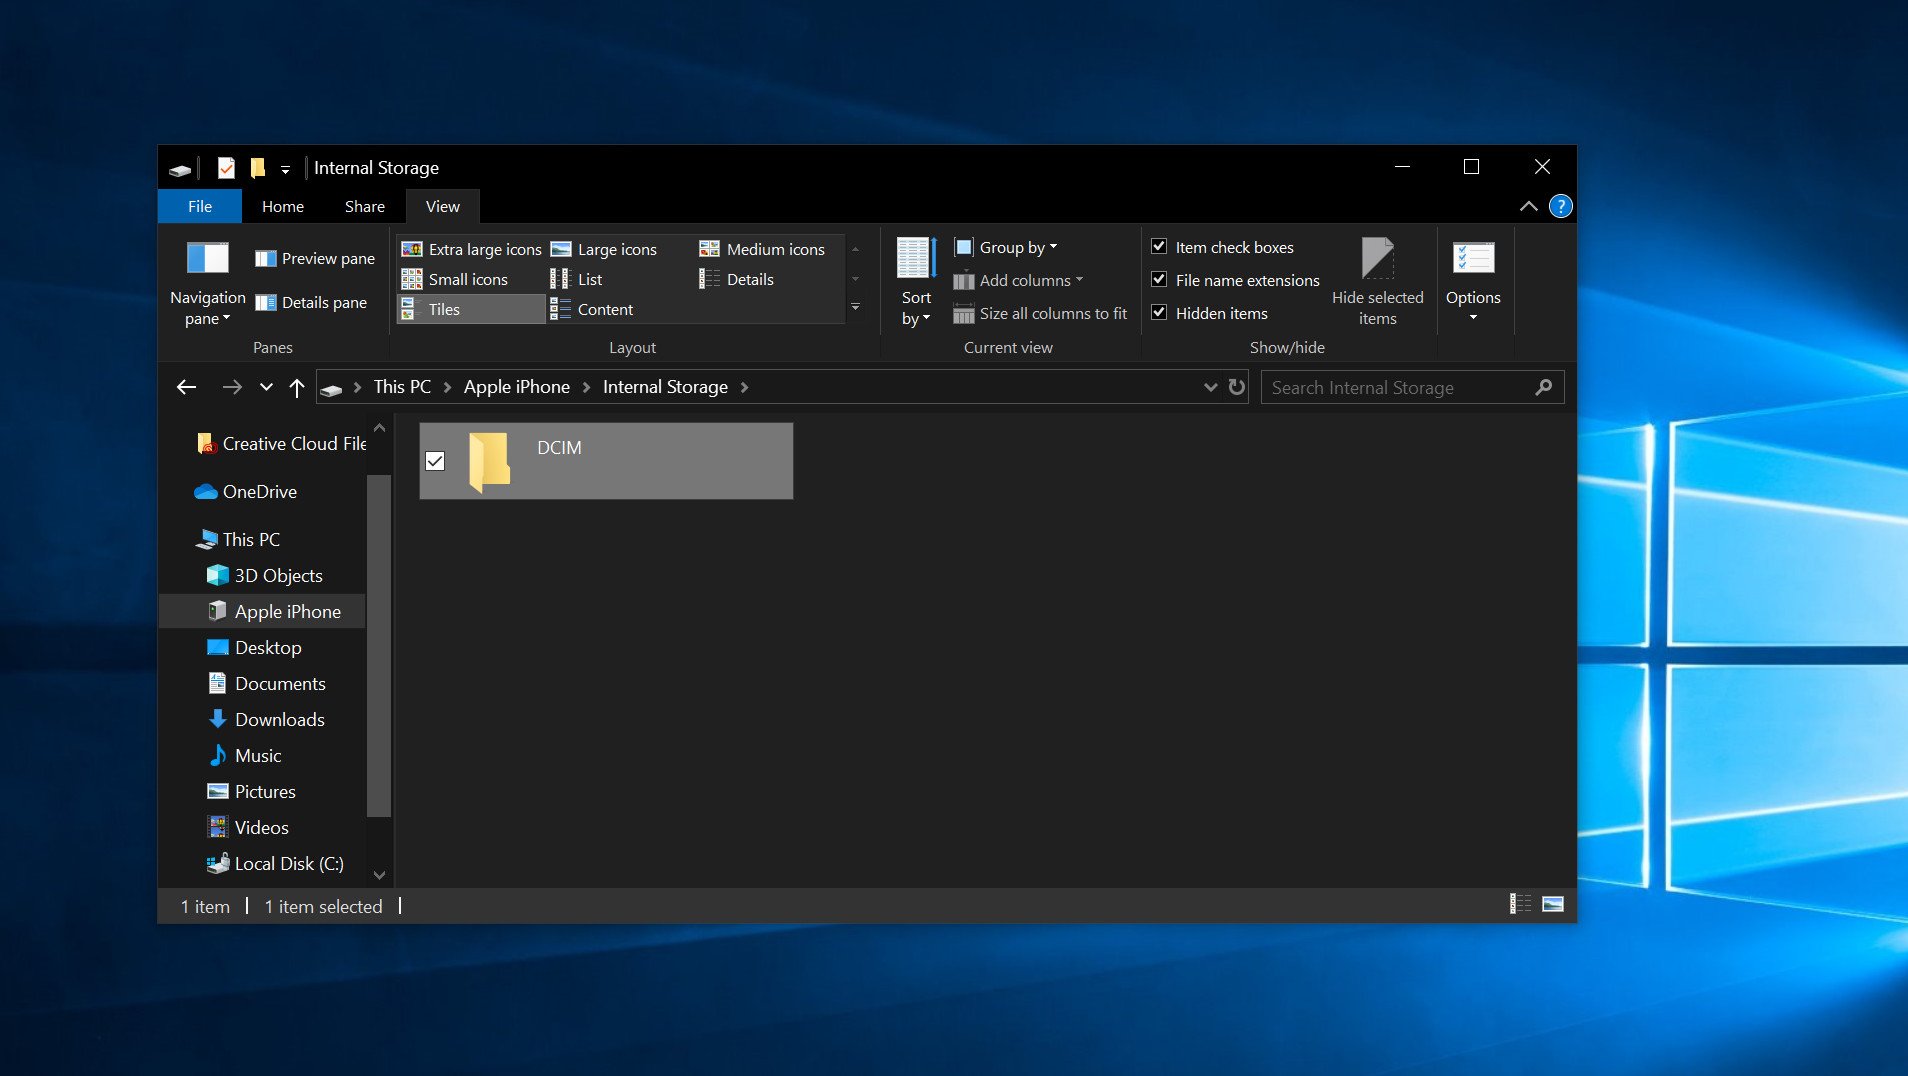
Click the arrow next to This PC in the card on the left side of the window. The arrow looks similar >.
 Source: Windows Central
 - Click NAME's iPhone or NAME'south iPad in the This PC sub-menu.
- Double-click Internal Storage.
-
Double-click DCIM.
 Source: Windows Central
 - Double-click a folder. They should all contain images.
-
Click an paradigm. Yous tin can hold the Ctrl key on your keyboard and click to select multiple images. You can also utilize the Ctrl + A shortcut on your keyboard to select all photos at once.
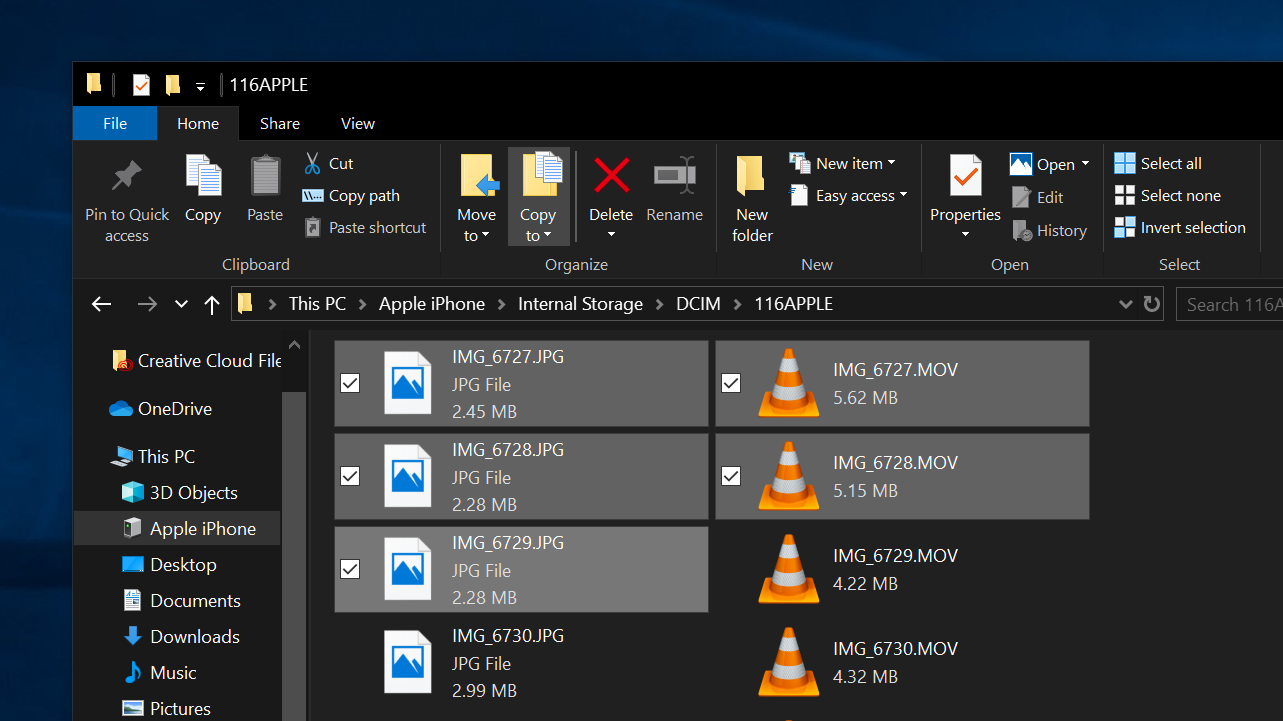 Source: Windows Central
 - Click Re-create to — information technology is located nigh the acme of the window.
- Click Choose location… to select a location. Yous tin also click one of the options listed in the dropdown menu.
- Click a destination to salvage the pictures.
- Click Re-create. Make sure you don't unplug your iPhone or iPad during the process!


How to transfer iPhone and iPad photos using the Windows ten Photos app
Windows 10 also ships with a dedicated Photos app, ideal for viewing and editing photos through a slick, easy interface. It also allows y'all to import photos from iPhones and iPads in bulk, providing a one-click solution to move all your photos to your PC.
- Plug your iPhone or iPad into your PC using a suitable USB cable.
- Launch the Photos app from the Showtime carte du jour, desktop, or taskbar.
-
Click Import. It is located in the elevation-right corner of the window.
 Source: Windows Primal
 - Click any photos y'all'd like to not import; all new photos will exist selected for import by default.
- Click Continue. The Photos app volition brainstorm the import process. Make sure you lot don't unplug your iPhone or iPad during the procedure!

How to transfer iPhone or iPad photos using iCloud
Windows 10 besides supports Apple tree's iCloud storage service, allowing iPhone and iPad users to wirelessly pull photos and videos from their accounts over the cyberspace. Unlike transfers over a USB cable, you don't need to install iTunes and dig around in local files.
Syncing photos via iCloud only requires the standalone iCloud app available via the Microsoft Shop and Apple, offer the option to automatically sync content uploaded using the aforementioned Apple ID. While you might demand to pay for extra iCloud storage when transferring media in bulk, it's a hassle-free way to import iPhone and iPad photos without the wire.
- Launch the Microsoft Shop from the Get-go menu, taskbar, or desktop.
-
Search for iCloud in the Microsoft Shop.
 Source: Windows Cardinal
 - Click Get. ICloud volition at present download to your PC.
- Click Launch once the download is consummate.
- Type your Apple tree ID.
-
Type your password.
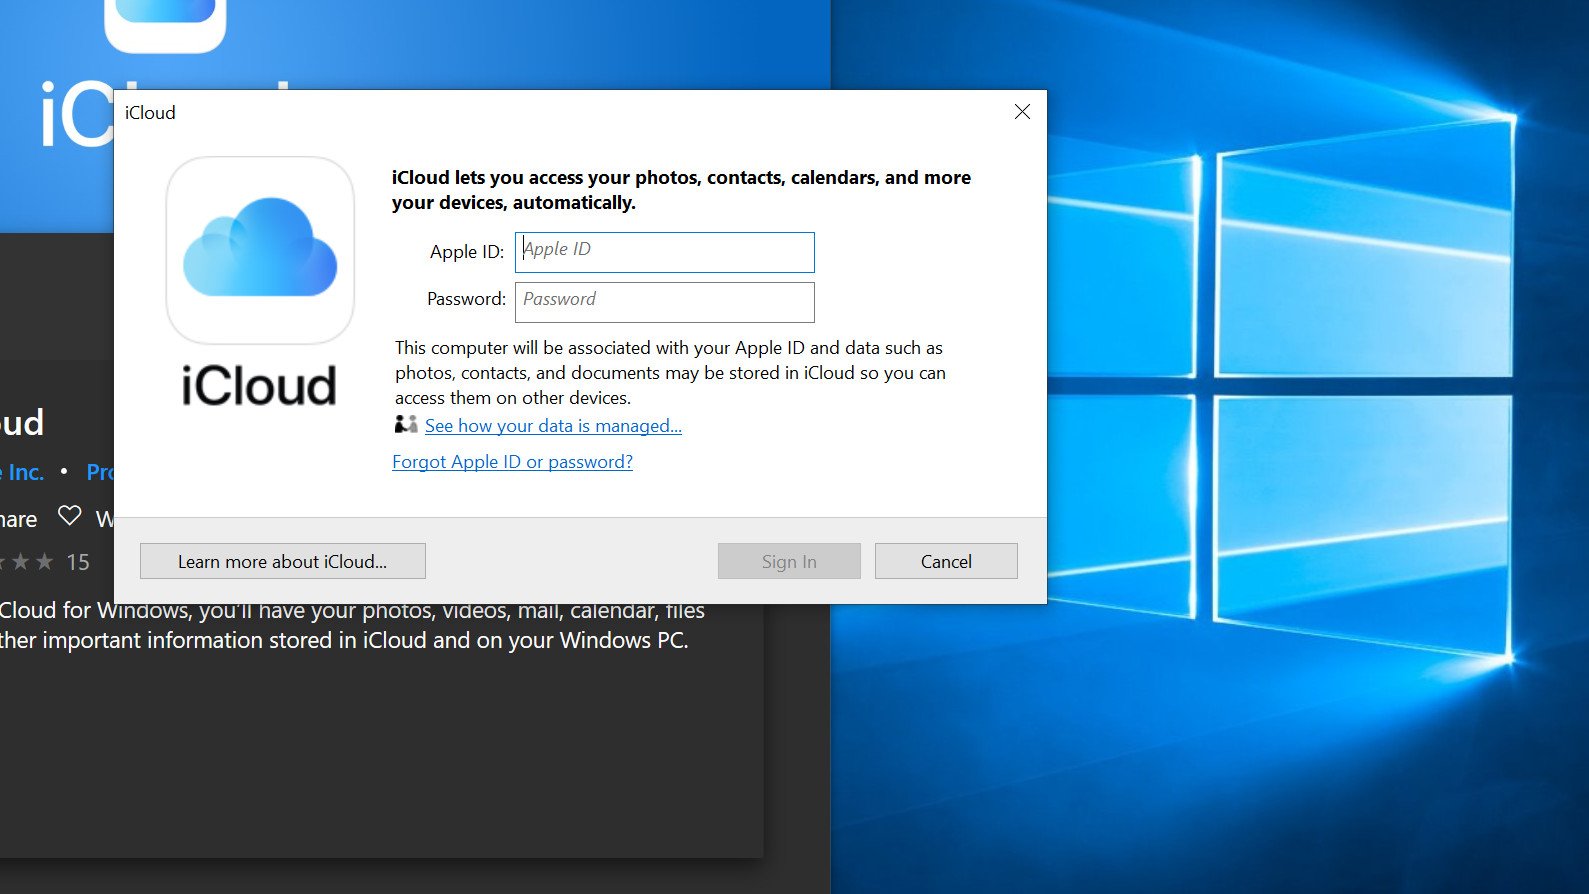 Source: Windows Central
 - Click Sign In.
-
Click the Options button next to Photos.
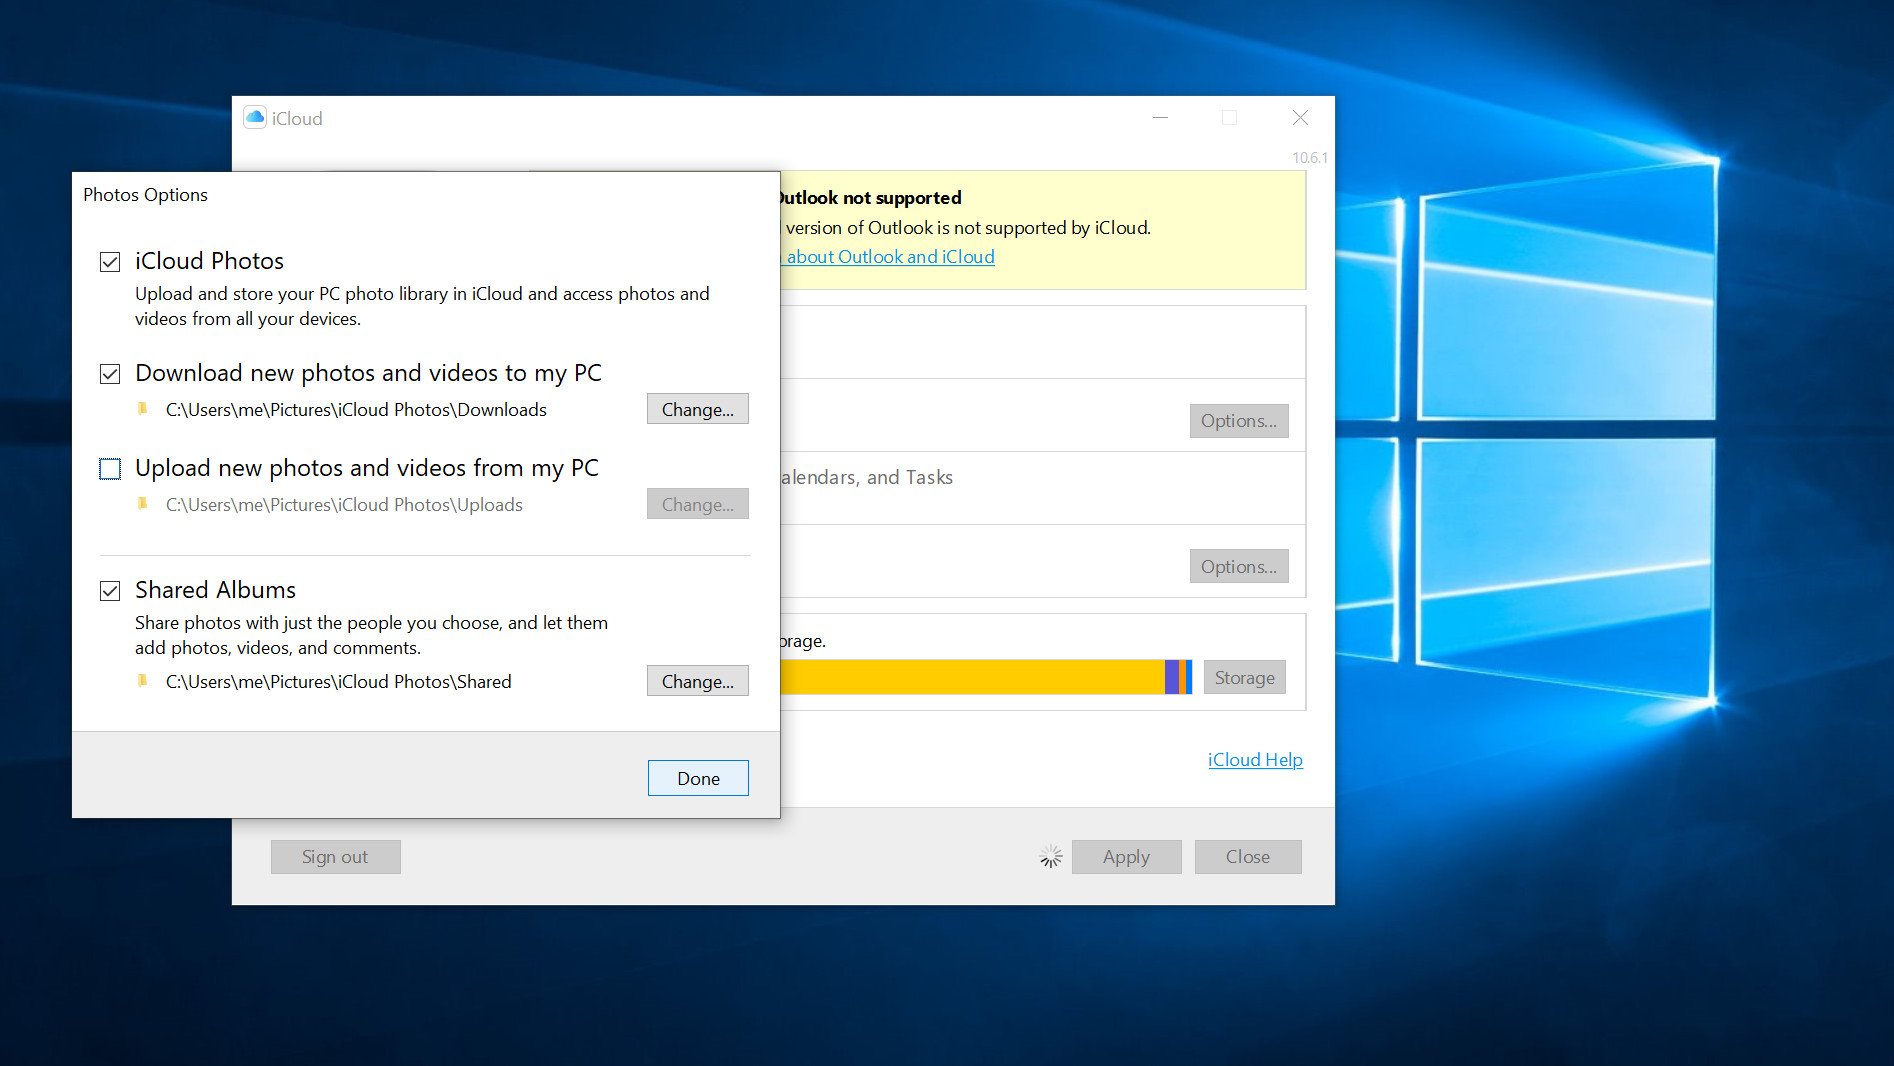 Source: Windows Central
 - Click the box next to iCloud Photos so that a checkmark appears.
- Click the box next to Upload new photos from my PC so that the checkmark disappears. You can set these options how you'd like, but this ensures you're just getting the photos off your iPhone or iPad onto your PC.
- Click Done.
- Click Apply. Any photos in your iCloud will now download to your PC.


Alternatively, y'all can download iCloud from Apple if you're using a Windows version prior to Windows 10. Folks using older versions of Windows will need to install the traditional application, although it offers identical features.
Our top equipment picks
Transferring your iPhone and iPad photos over to a PC with a trusty wired connection? This affordable cable could be for you lot.
Go hooked up

AmazonBasics Lightning to USB-A cable
Save on Apple tree's lightning cables
While official iPhone accessories aren't cheap, Amazon's in-house production line has an affordable alternative without sacrificing quality. The four-inch cable is clutter-complimentary for power packs, sporting Apple's MFi stamp of approval and a durable rubberized design.
Additional software
Don't forget Apple's costless apps for Windows 10, ideal for easy syncing between your phone and PC. These join some of the best Windows 10 apps for iPhone and iPad users, providing piece of cake access to Apple services via your PC.
![]()
iTunes (Costless at Microsoft)
iTunes welcomes Windows PCs into Apple'due south amusement empire, serving up music, movies, Tv set shows, and more. The gratuitous Microsoft Store app too bridges your PC to iPhone and iPad devices with ease, packing capabilities to sync and update.
![]()
iCloud (Costless at Microsoft)
iCloud's dedicated Windows 10 app brings your full cloud storage to a personal PC. It'southward fast and piece of cake to ready, ideal for shifting snaps between devices.
We may earn a commission for purchases using our links. Learn more than.

How To Transfer Photos From Iphone To External Hard Drive On Windows,
Source: https://www.windowscentral.com/how-transfer-photos-iphone-and-ipad-your-windows-10-pc
Posted by: medranogoomects.blogspot.com
0 Response to "How To Transfer Photos From Iphone To External Hard Drive On Windows"
Post a Comment